How to Move a Pool Table in 8 Steps
Relocating a pool table can be a formidable undertaking. The bulky frame, delicate slate, and intricate assembly, the task can quickly become overwhelming if you're not sure how to approach it. That's where our guide on 'How to move a pool table' will navigate you through the process, ensuring a safe and efficient move from preparation to pool table removal straight to reassembly.
13 min read
Key takeaways
- Recognise whether you have a slate or non-slate pool table as it impacts the moving process.
- Ensure you have all required tools and materials like a socket set, screwdrivers, moving blankets, and lifting straps.
- Measure doorways and navigate your home carefully to prevent damage.
- Evaluate the benefits of hiring professionals versus a DIY move, especially for complex or high-value pool table moves.
- Follow steps to properly disassemble your table, paying special attention to the slate.
- Wrap each part securely, especially the slate, to ensure it's transported without damage.
- Reassemble your pool table carefully, ensuring it's level for optimal play.
Moving a pool table or billiard table requires careful attention to detail and a strategic approach. Unlike regular furniture, pool tables are not just heavy, but also have delicate components that need special handling to avoid any damage. This guide aims to demystify the process of moving a pool table, highlighting the importance of preparation, using the right tools, and following the necessary steps for a safe and efficient move of your prized pool table . Whether you're an experienced mover or undertaking this task of how to move a pool table the first time, understanding the ins and outs of disassembly, transportation, and reassembly is key to keeping your table in immaculate condition and ready for a game of pool or snooker in the new spot. So let's dive in and figure out how to move your pool table together!
Step 1: Preparation
Before you even think about moving a pool table, it's crucial to lay the groundwork for a successful pool table move. This means understanding what you're dealing with, having the right tools handy, and planning the safest route from your current spot to the new one. Proper preparation is key.
Understanding your pool table
There are two common types of pool table/billiard tables. Recognise the type of pool table you have, as this affects how you'll dismantle and move it.
Slate pool tables - Slate pool tables feature a playing surface made from slate stone, offering a perfectly flat and durable area for precise gameplay. Slate tables are typically found in professional settings and serious home game rooms due to their superior quality. They are also known for their heavy, solid playing surfaces, require more people for safe handling
Non-slate pool tables - Use alternative materials like MDF (Medium Density Fibreboard), which are lighter and less expensive but may not provide the same level of play accuracy or longevity as slate. These non-slate tables are more common for casual play and budget-conscious consumers. Non-slate tables, while lighter, still demand careful disassembly and transport.
Accessing your pool table or billiard table
Assessing the moving needs for your pool table involves understanding its size, weight, and fragility. This assessment is crucial to determine the manpower and tools required for the move. For instance, a standard slate pool table can weigh anywhere from 220Kg to 454Kg for a professional-grade slate table, necessitating a team effort. Additionally, consider the layout of both the current and new locations. Tight corners, narrow hallways, or stairs can significantly complicate the move. Evaluating these factors helps in planning the safest and most efficient moving strategy.
Necessary tools and materials
To disassemble and move your pool table safely, you'll need some specific and essential tools and materials. This includes:
For disassembly and reassembly of the pool table:
- Socket set: For unscrewing the bolts on the rails and legs.
- Power drill: Helps in quickly removing screws.
- Screwdrivers: Both flathead and Phillips-head, for various screws.
- Staple remover or flathead screwdriver: For removing the staples holding the felt in place.
- Socket wrench: To loosen and remove nuts and bolts.
For protecting the pool table:
- Moving blankets: To protect the table's components during transport.
- Bubble wrap: For additional protection, especially for delicate parts.
- Shrink wrap or packing tape: To secure the wrapping materials.
For moving the pool table:
- Dolly or trolley: For moving the heavy parts of the pool table.
- Lifting straps: Especially useful for moving the heavy slate or securing it on the moving truck.
Plan the path through your home
Measure doorways, staircases, and hallways to ensure your own pool table can pass through easily. Removing obstacles and planning for tight turns are essential steps to prevent damage.
Alright, let's dive into the topic of navigating your home. First things first, we need to measure everything! Doorways, hallways, and those tricky spots that always seem to cause trouble. We want to make sure everything fits perfectly, no hitches along the way. Oh, and don't forget, protecting your home is just as important as protecting that precious pool table of yours. Floor coverings and padding around doorways will be your best buddies here.
Also, double-check that there are no obstacles blocking your path out of the house and onto the moving truck. We don't want anything getting in our way! Keep in mind that some parts of the pool table, like the slate, may require two people to carry. So, it's always better to make sure the path is clear and safe.
Navigating stairs when moving a pool table is a tricky but manageable part of the process if the pool table is disassembled into parts.
Here's a friendly tip: team effort is crucial. You'll want a few extra hands to help balance and guide each part of the table, especially the heavy slate. Take it slow and steady – one step at a time. It's also a good idea to clear the path and prioritise safety for both you and your helpers. With careful planning and a bit of teamwork, you'll navigate those stairs like a pro.
Choosing between DIY and professional movers
Now, here's a big question – are you going to move the billiard table yourself, or call in the pros? Both have their pros and cons. If you're doing it yourself, gather your friends or family because it's not a one-person job. You need to gather the right tools, and a bit of know-how. It's a great way to save some money, but it's not without risks. But if you're not up for it, there's no shame in getting professional movers who know exactly what they're doing. Professional pool table movers bring experience and expertise, significantly reducing the risk of damage. They handle the heavy lifting and tricky navigation, making the process stress-free. Weigh the cost against the potential for stress and risk before making your decision. So here's what you need to consider:
DIY Pool table removal
Pros:
- Cost savings: Doing it yourself can be less expensive than hiring professionals.
- Flexibility: Schedule the move according to your convenience.
- Control: Full oversight over the handling and transportation process.
Cons:
- Risk of damage: Without professional expertise, there's a higher risk of damaging the table or your home.
- Physical strain: Pool tables are heavy and cumbersome, posing injury risks.
- Equipment and vehicle: You may need to rent or purchase the right tools and a suitable vehicle.
Professional pool table removalists
Pros:
- Expertise: Professionals have the experience and knowledge to safely disassemble, move, and reassemble pool tables.
- Insurance: Most companies offer insurance coverage for damages during the move.
- Convenience: Saves you the effort and time, making the move stress-free.
Cons:
- Cost: Professional services can be significantly more expensive than a DIY approach.
- Scheduling: You'll need to work within the moving company's schedule.
Weighing these pros and cons can help you decide the best approach for your situation, ensuring your pool table's safe relocation. Remember, peace of mind can often be worth the extra cost.
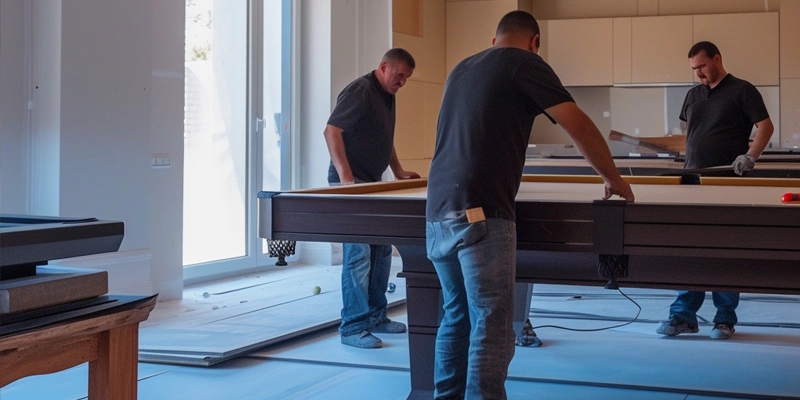
Step 2: Disassembling the pool table
Disassembling your pool table is the first step towards a successful move. Now the good news is there are really only four main parts to disassembling your own pool table. The felt cloth, the pockets and rails, the slate, and table frame and table legs. So let's go through each a step at a time.
Detach the pockets and rails
- Inspect attachment points: Carefully examine the pockets and rails to understand how they are attached to the table. If the pool table has drop pockets with a netting, they are most likely bolted onto the two perpendicular rails. If the table has drop pockets integrated as part of the rail, then there may be no need to remove the drop pocket separately. Each pool, billiard or snooker table is different.
- Remove pocket fasteners: Use a screwdriver or wrench to loosen and remove any fasteners securing the pockets to the railing, you may need to access from the underside of the table.
- Lift pockets out: Once loose, gently lift the pockets out of their positions.
- Locate the rail bolts: Access the underside of the pool table and locate the rail bolts and nut that is holding them in place with the table.
- Unbolt rails: Using a socket wrench, carefully unbolt the rails from the table.
- Organise and label hardware: As you remove bolts and screws, keep them organised by labelling and placing them in a zip lock bag for easy identification during reassembly.
- Gently detach rails: With all fasteners removed, gently lift the rails away from the table.
- Inspect and protect: Check all the parts for damage, you can then begin the wrapping process to protect each component of the rail and ball pockets.
Removing the felt with care
- Use a staple remover for stapled felt: For felt that's stapled to the table, use a staple remover or a flat-head screwdriver to carefully remove each staple.
- Lift the felt: Begin by gently lifting the felt from one end of the table.
- Roll or fold gently: Once the felt is detached, roll it or fold it carefully to avoid wrinkles or damage, preparing it for safe transport.
Taking apart the slate
- Prepare the area: Ensure you have a clear, safe space to lay down the slate once removed.
- Locate slate screws: Identify and access the screws that secure the slate to the table frame. Some slate tables may just be rested on the table frame. Remove any screws and place into a ziplock bag
- Separate the slate: A slate pool table would usually have 3 equal pieces of slate that is joined to each other. You will need to separate the slate to easily move it. Using the a flat blade screw driver, carefully run the blade between the gap of the slate at one end and gently pry to separate the slate.
- Carefully lift slate: With assistance, gently lift the slate off the table frame. This may require multiple people due to the weight of the slate. Use extreme caution, as slate is heavy and fragile.
- Wrap slate for protection: Once removed, securely wrap the slate in moving blankets or any other protective materials to prevent scratches or damage during transport.
Detaching the table legs and disassemble the table frame
- Locate corner brackets: This is usually a corner bracket that the legs are bolted to while also bolted to the table frame.
- Unbolt the table legs: Look for the bolts or screws securing the legs to the table frame or corner bracket. Remove the bolts at one end of the table that attaches to the legs. Remember to place any bolts in a ziplock bag for safe keeping.
- Detach the table legs: From here, with a helper, together you can lift the table frame up 5cm and slide the legs out and carefully sitting the same end on the floor. You can now remove the both the legs on the opposing end.
- Store legs safely: Wrap the all the legs in protective materials and set them aside for transport.
- Disassemble the table frame: All you are left with now is the table frame rested on the floor, you can unbolt or unscrew any corner braces that hold the table together and wrap each component up.
Step 3: Packing and protecting components
Packing and protecting your pool table components properly is a critical step in ensuring they arrive at your new location in the same condition they left. Here's what you need to do:
Wrapping and securing the parts
- Wrap the components: Wrap each pool table's side rails, legs, and table frame piece securely with moving blankets or bubble wrap, using packing tape or shrink wrap each piece to keep them in place.
- Bag and label parts: Bag and label all the parts like screws and bolts to avoid confusion during reassembly.
- Set aside: Set each wrapped component aside ready to load up in the moving vehicle.
Special considerations for slate
- If you have cardboard you can place a big piece of cardboard on either side and tape together. Otherwise bubble wrap will be fine too.
- You can then wrap each slate slab individually in moving blankets for extra padding and protection.
- Secure the wrapped slates with durable packing tape or shrink wrap.
- Use wooden crates or sturdy cardboard boxes for additional security.
- Ensure slates are kept horizontal and evenly supported to avoid stress.
- Clearly label each package with "fragile" to caution movers.
- It is now ready to load and position the slate carefully in the moving truck to prevent movement.
Step 4: Selecting the right moving truck and equipment
It's essential to choose a truck that can comfortably accommodate the size and weight of your pool table, especially the slate. Ensure the vehicle has enough space to avoid stacking items on top of the pool table parts. For equipment, dollies and lifting straps will be invaluable for moving heavy pieces like the slate. Using an enclosed moving truck can be helpful if you would like to shield the pool table from rain, sun or other environmental conditions that can damage the pool table. Also having a truck with a hydraulic tail lift can also help lifting heavy pieces of slate onto the moving truck without straining your back. A utility vehicle with an open tray at the back can also be used for fully disassembled pool tables, provided it can be safely positioned at the back of the ute and strapped down to prevent any moving during transit.
Step 5: Moving the pool table
With everything packed and the right equipment in hand, moving your pool table is the next major step to getting it to wherever it needs to end up.
Loading the table onto a moving truck
Begin by carefully loading the table components onto the moving truck, starting with the heaviest items like the slate. If the moving truck has a hydraulic lift, this is best to use with the heavy components. Otherwise use dollies and lifting straps for heavy lifting, ensuring safety and reducing strain. Secure each piece within the truck using straps. With the slate make sure that they're separately on a flat surface to prevent movement during transit.
Driving tips
Selecting the right moving truck is just the first step; how you drive matters just as much. Follow these driving tips to ensure the safe transit of your pool table components:
- Sudden starts, stops, and turns can shift the pool table and its parts, risking damage. Accelerate gently and brake well in advance. As well as use caution on turns, roundabouts, and corners.
- Keep to a moderate speed that allows you more reaction time should you need to stop.
- If you are driving in a utility vehicle, regularly check mirrors to ensure that the pool table parts remain secure in the tray.
- Avoid roads with poor surfaces and low-hanging branches that could potentially jostle or harm the components. If possible, choose routes with less traffic.
Step 6: Unloading the pool table
Once you arrive at your new home or office, unloading the pool table involves reversing the steps taken during loading, with careful attention to safety and preservation of each component. Begin by carefully removing the pieces from the moving truck, starting with the smallest items and saving the slate for last due to its weight and fragility. Plan the entry path into the new location, ensuring doorways and hallways are measured for a smooth transition. Once all components are inside, allocate sufficient space for reassembly, keeping the area clear of obstacles to facilitate the setup process.
Step 7: Reassembling the pool table
Reassembling the pool table is the final step in the moving process. Begin by setting up the frame and legs in the designated area, ensuring the structure is stable and level. Next, carefully place the slate onto the frame, adjusting it so that it sits perfectly flat. You may at this stage need to join the slate pieces together, filling in the joining gap with a plastic building filler and hardening before level it out and sanding down for a smooth and level surface. Reattach the pool table's felt to the slate, smoothing out any wrinkles and securing it in place with a staple gun. Finally, reassemble the rails and pool table's pockets, checking all connections for tightness and accuracy. Taking your time to carefully follow these steps ensures your pool table is ready for play.
Step 8: Hiring professional movers
We touched on the benefits of hiring a professional pool table removal company earlier on in this guide to help with your pool table move and would like to emphasize again that moving a pool table is no easy challenge without a team of strong helpers and some knowledge in disassembling the pool table. Professionals offer the expertise, equipment and insurance for the pool table move that allows you the convenience of handing the task over to someone else and reduce the risk of personal injury and damage to the pool table.
When to hire a professional pool table removalist?
Your should consider hiring a professional pool table removalist when:
- Complexity of the move: If the move involves navigating tight spaces, stairs, or long distances. Also when the weight of the pool table too over bearing.
- High-value tables: For antique or high-end pool tables where the risk of damage is too great.
- Lack of assistance: If you don't have enough physically able helpers or the necessary tools.
What to look for in a pool table moving service
When looking for a pool table service, look for professional movers with positive reviews and experience in moving pool tables. Make sure you get multiple quotes to ensure you are getting fair pricing, Find a Mover is a great start and can help with pool table removalists no matter where you live. Lastly inquire about their process, insurance coverage, and any guarantees.
Final thoughts
As you stand back, surveying the room where your pool table now proudly sits, ready for action, it's a moment to celebrate. Even if you chose to use a professional pool table removal service. Moving a pool table is no small feat. It's a journey that tests patience, strength, and sometimes even friendships. But here you are, having navigated the complex disassembly, careful packing, cautious transport, and meticulous reassembly. It's not just about moving a piece of furniture; it's about preserving a source of joy, competition, and camaraderie. So, take a moment to appreciate your effort and the effort of those who helped. The next game you play won't just be another round of pool; it will be a celebration of what you've accomplished. Here's to many more games on a table that has travelled well, thanks to your dedication and care.
Disclaimer: Moving a pool table is risky, both for personal safety and the table's integrity. It involves complex steps, handling heavy components, and potential injury or damage. High-value or intricate tables pose even greater risk. To minimise these risks, it's recommended to consult or hire professional pool table movers. They have the expertise, equipment, and insurance to ensure a safe move for you and your property.
Ready to Move? Find Your Perfect Mover!
Don't let moving stress you out. Compare quotes from our network of reliable movers, read genuine reviews, and book with ease. Save time, save money, and start your move with confidence today.
- Quickly compare movers
- Read verified reviews
- Book online with confidence
